BI Connector supports configuration with Command Line Interface(CLI). With the CLI commands, now you can execute a range of actions from managing data sources to activating licenses.
If you require to configure BI Connector via command line, all you need to do is just to create the input files in the prescribed JSON format, and execute the commands in the CLI.
All the commands must be executed from the directory where the biconnectorcfg.exe file is located (C:/Program Files/BI Connector), or you need to provide the complete path of the biconnectorcfg.exe file to execute commands.
Note:
- If you want to install BI Connector using silent installation, please refer to the following article: How to install BI Connector using silent install?
- By default, when creating/configuring a data source via CLI, it creates the Data source under the User DSN for the Desktop machine in the ODBC Administrator. For the server machine, the Data source is created under the System DSN.
Below are the commands that can be executed via the CLI:
- Create Data Source
- Get Data Source
- Update Data Source
- Delete Data Source
- Activate License Online
- View License Online
- Deactivate License Online
- Create Offline License
- Activate Offline License
- View Offline License
- Deactivate Offline License
- Add Subject Area
- Get Subject Area
- Delete Subject Area
- Add Report
- Get Report
- Delete Report
- Update Advanced Settings
- Get Advanced Settings
- Test Data Source
Create Data Source
Create-DataSource is the command for creating and configuring the Data Source.
By default, when creating a data source via CLI, it creates the Data source under the User DSN for the Desktop machine in the ODBC Administrator. For the server machine, the Data source is created under the System DSN.
Command syntax
biconnectorcfg.exe /Create-DataSource <File Path>
Example
biconnectorcfg.exe /Create-DataSource "C:\Program Files\BI Connector\cli_samples\CreateDataSource.json"
Input formats
Scenario - 1: Creating Data Source
The following input format is for creating a data source.
{
    "DataSourceName" : "Northwind SA",
    "Description" : "Northwind Subject Area",
    "ServerName" : "https://obieeprod.biconnector.com",
    "Port" : "9804",
    "Single Sign-On" : "Default",
    "DataSourceType" : "Subject Areas"
}
Note:
- The "DataSourceType" can only either be "Subject Areas" or "Reports".
- If there is no "Single Sign-On" configured for the OBIEE, the input must just be "" (empty string)
- The other values accepted in "Single Sign-On" are
- "Default"
- "OAM (Oracle Access Manager)"
- "WebAuth"
- "WebAuth(with SAML)"
- "Windows Native Authentication"
- "Taleo"
If you require to add subject areas or reports along with creating a data source, please refer below:
Scenario - 2: Adding Subject Areas while creating the Data Source
The following input format is applicable when adding Subject Area(s) to Manage Subject Area list while creating a Data Source.
{
    "DataSourceName" : "Northwind SA",
    "Description" : "Northwind Subject Area",
    "ServerName" : "https://obieeprod.biconnector.com",
    "Port" : "9804",
    "Single Sign-On" : "Default",
    "DataSourceType" : "Subject Areas"
    "SubjectAreas" : "Northwind, AdventureWorks"
}
Scenario - 3: Adding Reports while creating the Data Source
The following input format is applicable when adding Report(s) to Manage Reports list while creating a Data Source.
{
  "DataSourceName" : "European Orders Reports",
  "Description" : "European Orders Reports",
  "ServerName" : "https://obieeprod.biconnector.com",
  "Port" : "9804",
  "Single Sign-On" : "",
  "DataSourceType" : "Reports",
  "IncludeMyFolderReports" : "Yes",
  "UserName" : "obieeuser",
  "ReportList" : "/shared/European Orders/Sales_Revenue_By_Month, /shared/European Orders/Sales_Revenue_By_Quarter",
  "ReportFolderList" : "/shared/Marketing, /shared/PreSales"
}
Output message

Get Data Source
Get-DataSource is the command for retrieving the information configured for a particular DSN.
Command Syntax
biconnectorcfg.exe /Get-DataSource <File Path>
biconnectorcfg.exe /Get-DataSource <File Path>
Example
biconnectorcfg.exe /Get-DataSource "C:\Program Files\BI Connector\cli_samples\GetDataSource.json"
Input format
Scenario - 1: To get the information of a specific Data Source
The following input format is for getting the information for a specific data source.
{
    "DataSourceName" : "Northwind SA"
}
Scenario - 2: To get the information of ALL Data Sources
The following input format is for getting the information for all the configured data sources.
{
    "DataSourceName" : "ALL"
}
Output message
Scenario - 1: When fetching the information of a specific Data Source

Scenario - 2: When fetching the information of all the Data Sources
Update Data Source
Update-DataSource is the command for updating the created DSN.
Command syntax
biconnectorcfg.exe /Update-DataSource <File Path>
biconnectorcfg.exe /Update-DataSource <File Path>
Example
biconnectorcfg.exe /Update-DataSource "C:\Program Files\BI Connector\cli_samples\UpdateDataSource.json"
Input format
{
    "DataSourceName" : "Northwind SA",
    "ServerName" : "https://obieedemo.biconnector.com",
    "Port" : "9604",
    "Single Sign-On" : "Default"
}
Note:
The above JSON input shows update request only for updating the "ServerName", "Port" and the "Single Sign-On" fields. The corresponding fields can be updated by providing the field in the JSON.
Output message

Delete Data Source
Delete-DataSource is the command for deleting the created DSN.
Command syntax
biconnectorcfg.exe /Delete-DataSource <File Path>
biconnectorcfg.exe /Delete-DataSource <File Path>
Example
biconnectorcfg.exe /Delete-DataSource "C:\Program Files\BI Connector\cli_samples\DeleteDataSource.json"
Input format
{
    "DataSourceName" : "Northwind SA"
}
Output message
Activate License Online
Activate-License is the command for activating the BI Connector License key from online.
Command syntax
biconnectorcfg.exe /Activate-License <File Path>
biconnectorcfg.exe /Activate-License <File Path>
Example
biconnectorcfg.exe /Activate-License "C:\Program Files\BI Connector\cli_samples\ActivateLicense.json"
Input format
{
    "ActivationKey": "xxxxx-xxxxx-xxxxx-xxxxx-xxxxx-xxxxx-xxxxx-xxxxx",
    "FirstName": "Tony",
    "LastName": "Stark",
    "OrganizationName": "Stark Inc",
    "Email": "tony@stark.com",
    "PhoneNumber": "123456789"
}
Output message

View License Online
View-License is the command to get the details of a BI Connector License key from online. This command also provides the status of the activated license key.
Command syntax
biconnectorcfg.exe /View-License
Example
biconnectorcfg.exe /View-License
Input format
This command does not require any input JSON parameters.
Output message

Deactivate License Online
Deactivate-License is the command for deactivating the BI Connector License key from the particular machine.
Important Note: You need to deactivate a license online if it was activated online. Similarly, you need to deactivate a license offline if it was activated offline.
Command syntax
biconnectorcfg.exe /Deactivate-License
biconnectorcfg.exe /Deactivate-License
Example
biconnectorcfg.exe /Deactivate-License
Input format
Output message

Create Offline License
Create-OfflineLicense is the command for generating the offline activation file required for creating an offline license. After successful execution of this command, it is essential to upload the activation file (generated as the 'C:\ProgramData\Guidanz\BI Connector\license\offlineActivation.json' file) in the BI Connector Offline Activation page.
Command syntax
biconnectorcfg.exe /Create-OfflineLicense <File Path>
Example
biconnectorcfg.exe /Create-OfflineLicense "C:\Program Files\BI Connector\cli_samples\CreateOfflineLicense.json"
Input format
{
    "ActivationKey": "xxxxx-xxxxx-xxxxx-xxxxx-xxxxx-xxxxx-xxxxx-xxxxx",
    "FirstName": "Tony",
    "LastName": "Stark",
    "OrganizationName": "Stark Inc",
    "Email": "tony@stark.com",
    "PhoneNumber": "123456789"
}
Output message

Activate Offline License
Activate-OfflineLicense is the command for activating the license offline. To activate the license offline, you need to provide the response file generated from the BI Connector Offline Activation page.
Command syntax
biconnectorcfg.exe /Activate-OfflineLicense <Response File Path>
Example
biconnectorcfg.exe /Activate-OfflineLicense "C:\Program Files\BI Connector\cli_samples\ResponseFile.json"
Output message

View Offline License
View-OfflineLicense is the command to get the details of a BI Connector License key. This command also provides the status of the activated license key.
Command syntax
biconnectorcfg.exe /View-OfflineLicense
Example
biconnectorcfg.exe /View-OfflineLicense
Input format
This command does not require any input JSON parameters.
Output message

Deactivate Offline License
Deactivate-OfflineLicense is the command for deactivating the BI Connector license from the particular machine offline.
Important Note: You need to deactivate a license online if it was activated online. Similarly, you need to deactivate a license offline if it was activated offline.
Command syntax
biconnectorcfg.exe /Deactivate-OfflineLicense
Example
biconnectorcfg.exe /Deactivate-OfflineLicense
Input format
This command does not require any input JSON parameters.
Output message

Note: The output message shows that the offline deactivation file is generated on a specific path. You'll need to refer from step 6 of this article to execute the rest of the steps for completing the offline deactivation.
Add Subject Area
Add-SubjectArea is the command for adding one or more subject area(s) in the Manage Subject Area list.
Command syntax
biconnectorcfg.exe /Add-SubjectArea <File Path>
Example
biconnectorcfg.exe /Add-SubjectArea "C:\Program Files\BI Connector\cli_samples\AddSubjectArea.json"
Input format
{
    "DataSourceName" : "Northwind SA",
    "UserName" : "obieeuser",
    "SubjectAreas" : "Northwind, AdventureWorks"
}
Note: To add more than one subject area, use the following syntax "SubjectArea1, SubjectArea2, SubjectArea3" in the "SubjectAreas" field.
Output message

Get Subject Area
Get-SubjectArea is the command to view the list of subject area(s) added in the Manage Subject Area list.
Command syntax
biconnectorcfg.exe /Get-SubjectArea <File Path>
Example
biconnectorcfg.exe /Get-SubjectArea "C:\Program Files\BI Connector\cli_samples\GetSubjectArea.json"
Input format
{
   "DataSourceName" : "Northwind SA"
   "UserName" : "obieeuser"
}
Output message

Delete Subject Area
Delete-SubjectArea is the command to delete the Subject Area(s) added in the Manage Subject Area list.
Command syntax
biconnectorcfg.exe /Delete-SubjectArea <File Path>
Example
biconnectorcfg.exe /Delete-SubjectArea "C:\Program Files\BI Connector\cli_samples\DeleteSubjectArea.json"
Input formats
Scenario -1: Deleting specific Subject Area(s)
The following input format is applicable when deleting specific Subject Area(s) associated with a Data Source.
{
    "DataSourceName" : "Northwind SA",
    "UserName" : "obieeuser",
    "SubjectAreas" : "Northwind, AdventureWorks"
}
Scenario -2: Deleting ALL Subjected Areas
The following input format is applicable when deleting all the Subject Area(s) associated with a Data Source.
{
    "DataSourceName" : "Northwind SA",
    "UserName" : "obieeuser",
    "SubjectAreas" : "ALL"
}
Output message

Add Report
Add-Report is the command to add a report to the Manage Report List.
Command syntax
biconnectorcfg.exe /Add-Report <File Path>
Example
biconnectorcfg.exe /Add-Report "C:\Program Files\BI Connector\cli_samples\AddReport.json"
Input format
{
    "DataSourceName" : "Northwind Reports",
    "UserName" : "obieeuser",
    "ReportList" : "/shared/European Orders/Sales_Revenue_By_Month, /shared/European Orders/Sales_Revenue_By_Quarter",
    "ReportFolderList" : "/shared/Marketing, /shared/PreSales"
}
Output message

Get Report
Get-Report is the command to get the list of Reports added in the Manage Reports List.
Command syntax
biconnectorcfg.exe /Get-Report <File Path>
Example
biconnectorcfg.exe /Get-Report "C:\Program Files\BI Connector\cli_samples\GetReport.json"
Input format
{
   "DataSourceName" : "Northwind Reports"
   "UserName" : "obieeuser"
}
Output message

Delete Report
Delete-Report is the command to delete the Reports added in the Manage Reports List.
Command syntax
biconnectorcfg.exe /Delete-Report <File Path>
Example
biconnectorcfg.exe /Delete-Report "C:\Program Files\BI Connector\cli_samples\DeleteReport.json"
Input formats
Scenario -1: Deleting specific Reports
The following input format is applicable when deleting specific Report(s) associated with a Data Source.
{
   "DataSourceName" : "Northwind SA",
   "UserName" : "obieeuser",
   "ReportList" : "/shared/European Orders/Sales_Revenue_By_Month",
   "ReportFolderList" : "/shared/Marketing"
}
Scenario -2: Deleting ALL Reports
The following input format is applicable when deleting all the Report(s) associated with a Data Source.
{
   "DataSourceName" : "Northwind SA",
   "UserName" : "obieeuser",
   "ReportList" : "ALL",
   "ReportFolderList" : "ALL"
}
Output message

Update Advanced Settings
Update-AdvancedSettings is the command to configure the advanced settings of BI Connector.
Command syntax
biconnectorcfg.exe /Update-AdvancedSettings <File Path>
Example
biconnectorcfg.exe /Update-AdvancedSettings "C:\Program Files\BI Connector\cli_samples\UpdateAdvancedSettings.json"
Input format
{
  "CustomHTTPTimeout" : "5",
  "IgnoreInvalidCertificate" : "true",
  "SuppressSelectStar" : "true",
  "IgnoreTablesWithNoColumns" : "true",
  "PrefixFolderNameInTableName" : "false",
  "NullDateValue(forPowerBI)" : "1900-12-31",
  "MaxRowsFetched" : "50000",
  "EnableQueryLogging" : "false"
}
Output message

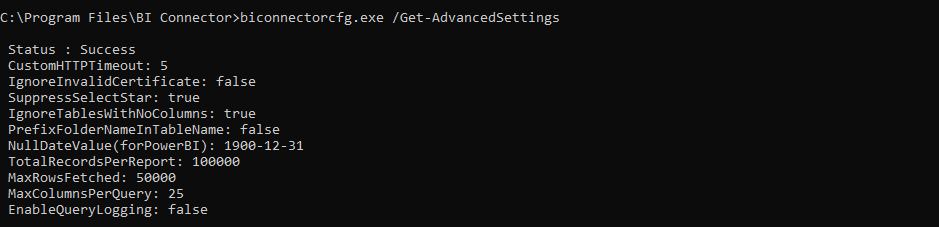
Get Advanced Settings
Get-AdvancedSettings is the command to get the Advanced settings parameters configured.
Command syntax
biconnectorcfg.exe /Get-AdvancedSettings
Example
biconnectorcfg.exe /Get-AdvancedSettings
Input format
This command does not require any input JSON parameters.
Output message
Test Data Source
Test-DataSource is the command to validate the connection to the OBIEE and also validates the configured Subject Area(s) / Report(s).
Command syntax
biconnectorcfg.exe /Test-Datasource <DSN_name> <username> <password>
Example
biconnectorcfg.exe /Test-Datasource "Northwind SA" obieetest xxxxxxxxxx
Input format
This command does not require any input JSON parameters.
Output message

Attachments (1)
