Before you start
- You have completed Steps 1–3 in Azure Synapse: Create and Run Fusion Pipelines for BI Publisher Data Models and OTBI Reports (log in, import the pipeline template, and map your connections).
- Your Data Models Lookup Table is created and loaded in your Synapse Dedicated SQL Pool. If not, see Lookup Tables for Data Models.
- You know your Dedicated SQL Pool database name.
Steps 4 to 8 — Configure, map, and run
Step 4 — Select the Dedicated SQL Pool database in the dataset
This is done on a Dataset, not a pipeline activity, so it is configured outside the pipeline template.
→ From the left panel, go to Data.
→ Under Linked, expand Integration Datasets.
→ Click SYNAPSE_DEDICATED_SQL_POOL_TABLES.
→ On the Connection tab, set SQL Pool — select your Dedicated SQL Pool database name.
Step 5 — Map the pipeline fields (Data Models to Synapse Dedicated SQL Pool)
Refer the screenshot of a sample Plug-n-play Pipeline template for quick navigational reference:
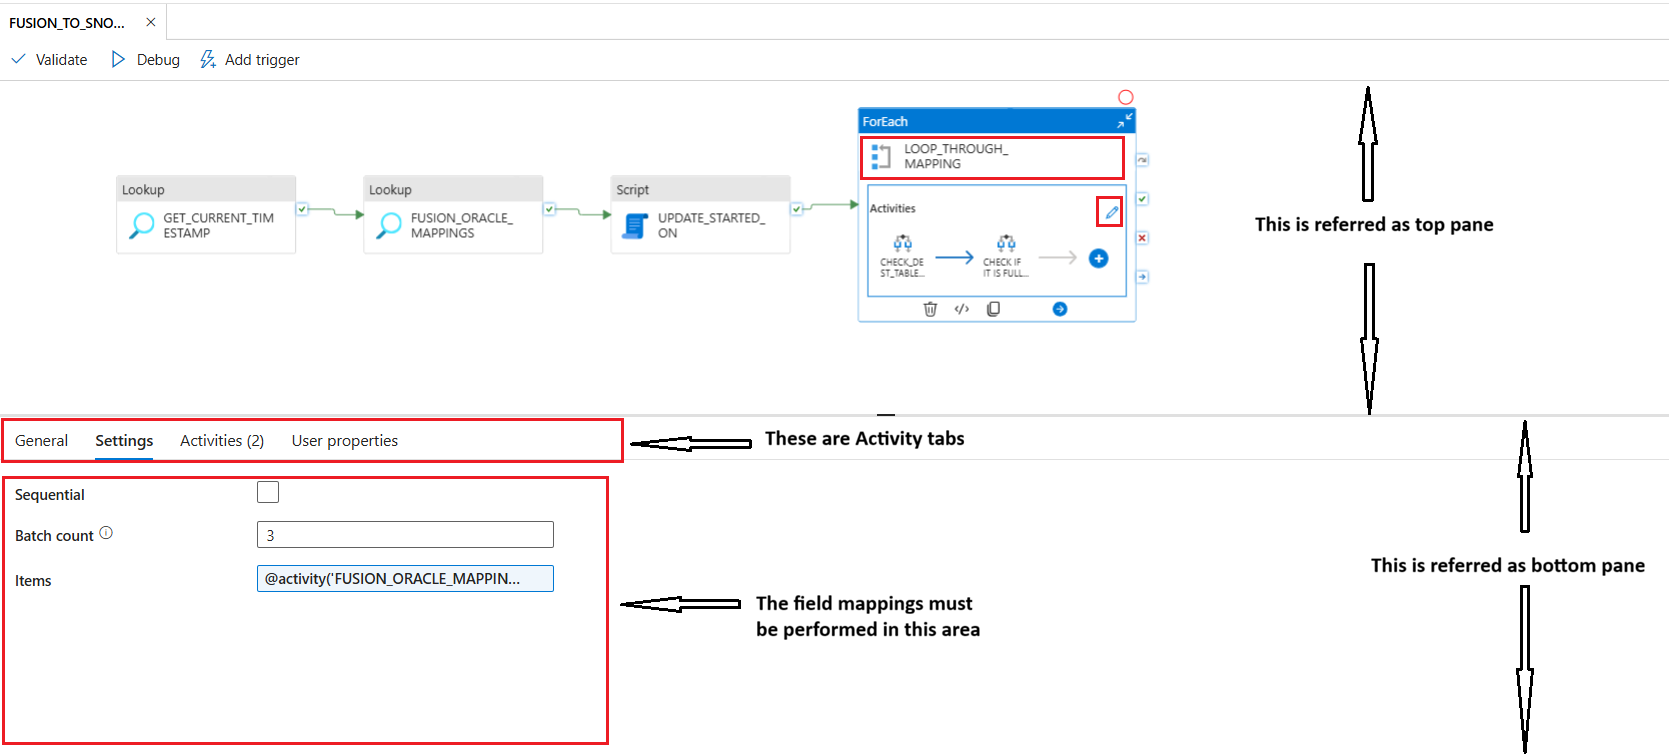
Complete the mappings row by row by referring to the table below.
For each row, start from the cell in the left. Complete the steps in that left-most cell, and move on to the steps on the cells in the right. After the steps in a row is completed fully, start from the left cell in the next row.
Finish the steps in all the rows.
| Pipeline activity (and sub-activities nav) | Activity tab | Mappings |
|---|---|---|
| → Click LOOP_THROUGH_MAPPINGS in the top pane → Click Edit in the Activities box → Double-click POST_PROCESSING_FULL_LOAD | → Click the Settings tab at the bottom pane | Map the following in the bottom pane: → SQL Pool — select the Dedicated SQL Pool database name → Stored Procedure Name — Click Refresh next to the dropdown and select the stored procedure you created before (default [dbo].[UPDATE_LOOKUP_STATUS])→ If Enter manually is checked, uncheck it to select from the dropdown instead |
| → Double-click POST_PROCESSING_DELTA_DATA in the top pane | → Click the Settings tab at the bottom pane | Map the following in the bottom pane: → SQL Pool — select the Dedicated SQL Pool database name → Stored Procedure Name — Click Refresh next to the dropdown and select the stored procedure you created before (default [dbo].[UPDATE_LOOKUP_STATUS])→ If Enter manually is checked, uncheck it to select from the dropdown instead |
| → Double-click GET_ALL_DATA_FROM_FUSION in the top pane | → Click the Settings tab at the bottom pane | Under Enable staging: → Storage Path (Optional) — This field is optional. If you do not provide a path, the service creates a container automatically to store temporary data. Specify a path only if you use Storage with a shared access signature, or you require temporary data in a specific location |
| → Double-click GET_DELTA_DATA in the top pane | → Click the Settings tab at the bottom pane | Under Enable staging: → Storage Path (Optional) — This field is optional. If you do not provide a path, the service creates a container automatically to store temporary data. Specify a path only if you use Storage with a shared access signature, or you require temporary data in a specific location |
Step 6 — Set up a trigger for automated runs
Click Add trigger at the top and set up the refresh schedule for automated pipeline runs.
Step 7 — Run the pipeline
Trigger the first pipeline run by clicking the Run option at the top. Enter the Lookup table name and Destination schema name on the prompted parameter values. After the run completes, you can verify if the pipeline executed successfully by checking the tables loaded on to the destination schema. The next run would automatically kick-in based on the schedule you set in Step 6.
Step 8 — Publish the changes
Click Publish all at the top left. Once the validation passes, click Publish to complete.