Overview
The BI Connector and the BI Connector VS Code Extension provide a Table-Level Access Security feature that enables administrators to control which database tables developers can query. Access is determined by the Oracle role assigned to each developer.
This functionality is configured using a User Defined Table (UDT) in Oracle. The table stores:
- Whether table-level security is enabled or disabled.
- The list of developer roles.
- The table access rules for each role, including which tables are allowed and which are restricted.
This guide describes the complete one-time configuration process, from generating the security files to assigning developer roles.
Note: This configuration only needs to be completed once for each Oracle instance. Complete the steps in the order presented.
Prerequisites
Before starting, ensure that the administrator performing the setup has the required Oracle roles.
| Required Role | Purpose |
|---|---|
| IT Security Manager | Creates developer roles, assigns roles to users, and runs the security synchronization process. |
| Human Capital Management Integration Specialist | Imports the security files using HCM Data Loader. |
You will also need the following information:
- A valid Legislative Data Group name from your Oracle instance (for example, US Legislative Data Group).
- Administrator email address. (Email address that receives notifications when a user attempts to preview a table they don't have access to. )
- Administrator name. (Administrator name displayed in the notification email. )
Step 1. Generate the Security Files
The security files define the User Defined Table and the initial access configuration. They can be generated from either the BI Connector desktop application or the VS Code Extension.
Generate from BI Connector
- Open BI Connector.
- Click the Help icon.
- Select Generate Security Files.
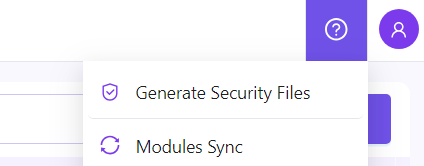
Generate from the VS Code Extension
- Open VS Code.
- Go to BI Connector Extension
- Open Settings.
- Click Generate Files.
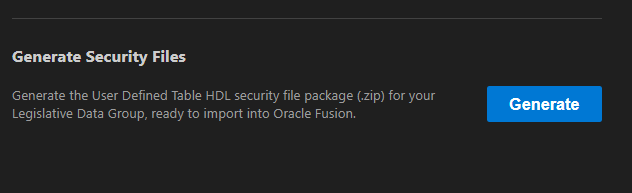
Enter the Required Information
Provide the following information:
- Legislative Data Group. This value must exactly match an existing Legislative Data Group in your Oracle instance.
- Administrator Email. Email address that receives notifications when a user attempts to preview a table they don't have access to.
- Administrator Name. Administrator name displayed in the notification email.
Note: To view the Legislative Data Groups available in your Oracle instance, navigate to My Enterprise > Setup and Maintenance and search for the Manage Legislative Data Groups task. Use one of the listed names exactly as it appears, as any mismatch will cause the import to fail.
After entering the required information, click Generate.
Generated Files
Three ZIP files are generated.
| File | Description |
|---|---|
UserDefinedTableAndColsContent.zip | Creates the User Defined Table and its columns. |
UserDefinedTableRowsContent.zip | Creates the security rule rows. |
UserDefinedTableValuesContent.zip | Creates the role-to-table access values. |
Keep these files available, as they will be imported into Oracle during Step 3.
Step 2. Create the Developer Roles
Developer roles must be created in the Oracle Security Console before the security files are imported.
- Navigate to Navigator > Tools > Security Console > Roles.
- Click Create Role.
- Set Role Category to BI - Abstract Roles.
- Use the same value for both Role Name and Role Code.
Create each of the following roles exactly as shown:
XXBIC_Benefits_DeveloperXXBIC_Financial_DeveloperXXBIC_Payroll_DeveloperXXBIC_Procurement_DeveloperXXBIC_SCM_DeveloperXXBIC_Super_DeveloperXXBIC_Super_HR_DeveloperXXBIC_Super_HR_Developer_No_PII
Important
- These roles act only as containers. Do not manually add privileges to them.
- Access permissions are provided by the User Defined Table that is imported in Step 3.
- Always create the roles using the exact names contained in the generated files.
Step 3. Import the Security Files
Import the generated security files into Oracle using HCM Data Loader.
Note: If the Data Exchange work area is not available, verify that the Human Capital Management Integration Specialist role has been assigned. After the role is assigned, sign out and sign back in.
Navigate to:
My Client Groups > Data Exchange > Import and Load Data
For each file:
- Click Import File.
- Select the ZIP file.
- Click Submit Now.
- Wait for the import to complete before importing the next file.
Import the files in the following order.
| Order | File | Purpose |
|---|---|---|
| 1 | UserDefinedTableAndColsContent.zip | Creates the User Defined Table and its columns. |
| 2 | UserDefinedTableRowsContent.zip | Creates the security rule rows. |
| 3 | UserDefinedTableValuesContent.zip | Creates the role access values. |
The import is successful when both Import Status and Load Status display a green check mark and 0 Failed Objects.
Step 4. Verify the Configuration
Before assigning developer roles, verify that the configuration completed successfully.
Confirm the following:
- All developer roles appear in the Security Console. Searching for the prefix
XXBIC_is recommended. - All three HCM Data Loader imports completed successfully.
- Each import shows 100% Complete with 0 Failed Objects.
Step 5. Assign a Developer Role
After the configuration is complete, assign the appropriate developer role to each developer.
- Navigate to Security Console > Users.
- Search for the user.
- Open the user record and click Edit.
- Click Add Role.
- Select the appropriate developer role.
- Click Save and Close.
The assigned role determines which database tables the developer can query.
When Role Changes Take Effect
User privileges are retrieved when:
- A new connection is created, or
- An existing connection is updated.
Important: If you change a user's roles in Oracle, update the connection in BI Connector or the VS Code Extension afterwards. The role changes will not be reflected until the connection is updated (or a new connection is created).
Example: Granting Access to General Ledger Tables
Assume a developer requires access to General Ledger (GL) tables.
The XXBIC_Financial_Developer role includes access to table patterns such as GL_%, together with Payables (AP), Receivables (AR), Assets (FA), Subledger Accounting, and Tax tables.
Although XXBIC_Super_Developer also provides access, it grants unrestricted access to all application tables. As a best practice, assign the most specific role that satisfies the user's requirements.
To grant access:
- Open the developer's user record in the Security Console.
- Click Edit.
- Click Add Role.
- Assign
XXBIC_Financial_Developer. - Click Save and Close.
The developer can now query General Ledger tables using the BI Connector Query Editor.
Developer Roles
| Developer Role | Access |
|---|---|
XXBIC_Super_Developer | Full access to all supported application tables. |
XXBIC_Financial_Developer | Finance modules including General Ledger (GL), Payables (AP), Receivables (AR), Assets (FA), Subledger Accounting, and Tax. |
XXBIC_SCM_Developer | Supply Chain modules including Inventory, Shipping, Costing, and Order Management. |
XXBIC_Procurement_Developer | Procurement and Purchase Order related tables. |
XXBIC_Payroll_Developer | Payroll tables and Fast Formula objects. |
XXBIC_Benefits_Developer | Benefits module tables. |
XXBIC_Super_HR_Developer | All Human Resources and HCM tables. |
XXBIC_Super_HR_Developer_No_PII | Human Resources and HCM tables excluding Personally Identifiable Information (PII). |
Personally Identifiable Information (PII)
The XXBIC_Super_HR_Developer_No_PII role excludes access to sensitive personal information.
Examples include:
- National identification numbers.
- Salary information.
- Home addresses.
- Other personally identifiable employee information.
This role is intended for users who require broad Human Resources data access without exposure to confidential personal information.
Creating a Custom Developer Role
The standard developer roles included with the generated security files are suitable for most implementations. However, you can also create your own custom developer roles to meet specific business requirements.
A template ZIP file is provided to help you create a custom role. The template contains the required Oracle HCM Data Loader files that you can modify before importing into Oracle.
Download the template: XXBIC_GL_DEVELOPER_Role.zip
Template Contents
The template contains two ZIP files.
| File | Purpose |
|---|---|
UserDefinedTableAndColsContent.zip | Defines the custom developer role (User Defined Table column). |
UserDefinedTableValuesContent.zip | Defines the table access rules for the custom role. |
Step 1. Extract the Template
Extract the template ZIP file.
You will find the following files:
UserDefinedTableAndColsContent.zipUserDefinedTableValuesContent.zip
Extract both ZIP files. Each ZIP contains a UserDefinedTable.dat file that must be modified.
Step 2. Rename the Developer Role
The template uses XXBIC_GL_DEVELOPER as an example role.
You can rename this to any role name that follows your organization's naming convention.
For example:
XXBIC_GL_DEVELOPER
can be changed to
XXBIC_FINANCE_REPORTING_DEVELOPER
or
XXBIC_CUSTOM_AP_DEVELOPER
The role name must be updated in both DAT files.
Update in UserDefinedTableAndColsContent
Locate the following line:
MERGE|UserDefinedTableColumn|XXBIC_GL_DEVELOPER|...
Replace XXBIC_GL_DEVELOPER with your new role name.
For example:
MERGE|UserDefinedTableColumn|XXBIC_FINANCE_REPORTING_DEVELOPER|...
Update in UserDefinedTableValuesContent
Locate every occurrence of the role name.
For example:
MERGE|UserDefinedTableColumnInstance|...|XXBIC_GL_DEVELOPER|...
Replace it with the same role name used in the previous file.
Important: The role name must be identical in both DAT files. Any mismatch will cause the import to fail.
Step 3. Configure Table Access Rules
The UserDefinedTableValuesContent file contains the table access rules.
Each rule consists of:
- A rule identifier (such as
LIKE_001orNOTLIKE_001) - A table pattern
- The developer role
LIKE Rules
A LIKE rule allows access to tables matching a pattern.
Example:
GL_%
This grants access to all tables beginning with GL_.
Additional examples:
AP_%
AR_%
PO_%
PER_ALL_PEOPLE_F
NOTLIKE Rules
A NOTLIKE rule blocks access to tables matching a pattern.
Example:
PER_PERSONS
This prevents access to the PER_PERSONS table even if another rule allows broader access.
Additional examples:
PER_%
PAY_PERSONAL_%
HRC_%
Step 4. Add Multiple Rules
You can add as many LIKE and NOTLIKE rules as required.
Each rule must use a unique identifier.
Example:
LIKE_001
LIKE_002
LIKE_003

NOTLIKE_001
NOTLIKE_002
NOTLIKE_003
Example configuration:
LIKE_001      GL_%
LIKE_002      AP_%
LIKE_003      AR_%
LIKE_004      FA_%

NOTLIKE_001   PER_PERSONS
NOTLIKE_002   PER_EMAIL_ADDRESSES
NOTLIKE_003   PAY_PERSONAL_DATA
This configuration grants access to all General Ledger, Payables, Receivables, and Fixed Assets tables while excluding the specified HR and payroll tables.
Note: Always use sequential and unique rule identifiers. Do not duplicate identifiers such as LIKE_001 or NOTLIKE_001.
Step 5. Save and Repackage the Files
After making your changes:
- Save both
UserDefinedTable.datfiles. - Replace the original DAT files inside their respective ZIP files.
- Ensure the ZIP file names remain unchanged.
Step 6. Import the Custom Role into Oracle
Once the files have been updated and repackaged, import them into Oracle using HCM Data Loader.
Follow the same upload procedure described in Step 3. Import the Security Files earlier in this guide.
After the import completes successfully:
- Create the corresponding developer role in the Security Console using the same role name you specified in the DAT files.
- Assign the role to the required users.
- Run the Import User and Role Application Security Data scheduled process.
- Ask users to sign out and sign back in before testing access.
Note: Any time you modify the access rules for a custom role, update the DAT files and upload them again by following Step 3. Import the Security Files. This ensures the latest table access rules are applied in Oracle.
Migrating from SQLConnect to BI Connector
SQLConnect uses a similar User Defined Table configuration setup for table-level security. The BI Connector fully supports the SQLConnect configuration.
If you are currently using SQLConnect and need to migrate to the BI Connector, no additional steps are required on the Oracle Fusion side. You can use the BI Connector straight away with your existing configuration.
To migrate:
- Install the BI Connector.
- Create a connection.
- Use the Query Editor without any changes.
Frequently Asked Questions (FAQ)
1. How many times do I need to complete this configuration?
Only once per Oracle instance. After setup, you only assign roles to developers as needed.
2. Which Oracle roles does the administrator need?
IT Security Manager and Human Capital Management Integration Specialist.
3. Where can I generate the security files?
From BI Connector (Help > Generate Security Files) or the VS Code Extension (Settings > Generate Files).
4. Does the order of importing the ZIP files matter?
Yes. Import UserDefinedTableAndColsContent.zip first, then UserDefinedTableRowsContent.zip, then UserDefinedTableValuesContent.zip. Wait for each import to complete before starting the next.
5. Should I add privileges to the developer roles?
No. The roles are containers only. All access permissions come from the User Defined Table imported in Step 3.